| Importing raw/unsupported images into MRIcro |
Introduction
New: This page describes new features, you need MRIcro 1.35 or later.
MRIcro can automatically read a wide range of image formats. For a complete listing of the formats that MRIcro supports, please visit the MRIcro supported image format table. This table also lists other file free file converting tools. If your image format is supported, you can either drag and drop individual images onto MRIcro to view them or batch convert your images to the Analyze format used by MRIcro, SPM and other popular image software. One advantage of converting your images is you can stack individual 2D slices into a single 3D volume, and then render views of your data set. This topic is also briefly discussed in the MRIcro manual.
What if your image format is not supported? The MRIcro web page describes quick and dirty tricks for viewing single images. Here I describe how you can use MRIcro to batch convert unsupported data types. This looks difficult, but most labs always collect data in the same sequence, so once you have done this once, you can apply the same values time after time.
Important: I am providing a sample dataset that you can work with yourself to learn the techniques. These are Toshiba images (3 slices, each x/y/zdim=512,512,1, offset= 8704, datatype=16bit, endian=big) of a dinosaur egg, courtesy of Roberto Quevedo. To download the sample dataset, shift+click here.
A. Gathering information about your images.
This requires several steps. There are a couple of things you NEED to know:
In addition, there are a couple of facts that are helpful to know:
B. Estimating Values
If you have all of this information, you can procede directly to section C of this web page. Otherwise, you will have to try to guess some of these values. Note that virtually all images follow the formula:
In the above example:
Note that for most images:
| C. Describing the header Once you have estimated information about the image, enter these values into MRIcro's Header Information panel. Launch MRIcro and carefully to enter each of your values (illustrated on the right):
Now, drag and drop your image onto MRIcro. If it displays correctly, procede to Section D. If not, try other estimates for your Xdim/Ydim/Zdim/Offset/DataType and repeat Section C until you get it right. Below are some examples of what it looks like when you enter the incorrect values:
|
 |
D. Converting your images
Once you have described your images, you can stack all the images into a single file. This requires MRIcro 1.35 or later. Choose 'Convert foreign to analyze' from MRIcro's 'Import' menu.
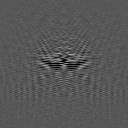
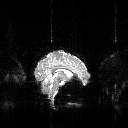
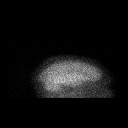
| MRI image reconstruction: People sometimes send me MRI scans that do not look correct when viewed with MRIcro. Often, it turns out that the image simply need to be reconstructed. Both of the images on the right are infact the same sagittal image of the brain. The left image is shown prior to reconstruction (k-space, visit this page for examples), and the right image is after 2D fourier transforms have been applied to the image. Most professional MRI scanners include their own software for reconstruction, and typically only the reconstructed data is saved. However, some research scanners and some very fast echo planar imaging sequences (e.g. fMRI scans that look at brain activity) save unreconstructed data (for example, with some scanners the EPI acquisition speed exceeds the speed of the reconstruction). If you do have unreconstructed data, you should first see if your scanner has came with its own reconstruction tools. If not, I highly recommend Pawel Tokarczuk's Free Image Reconstruction Tool (IRT) for Windows. IRT is useful for learning about k-space, and it allows you to manually adjust the reconstruction to minimise artifacts (e.g. ghosting). The software includes sample images and clear documentation. In fact, it is faster than any of the proprietary professional packages I have seen. Once you have reconstructed your data, you should be able to view the images using MRIcro. PET/SPECT/CT reconstruction Before processing these images look like a series of plain-film XRays taken from different angles. In these images each pixel represents the total attenuation (or emission) along the depth plane. The example on the left shows a SPECT scan prior to reconstruction, from this angle you can see a sagittal rendering of the brain, with the nose pointing toward the right. A series of these images are taken from different angles. After reconstruction, each voxel will only represent one depth, and the end result is a series of slices, as shown on the right (here you see an axial slice). MRIcro does not reconstruct images, so you will need to process your images using your scanner or freely available software before viewing them with MRIcro. |
|