| Lesion mapping with MRIcro |
Table of Contents
This page describes how my free MRIcro software can be used to map the anatomical location of lesions in neurological patients. To download the software, please visit the MRIcro homepage. A tutorial and FAQ are also available to describe some of the general features of the software. In particular, the tutorial provides important about mapping lesions. In contrast, this page gives a general overview of some of the general techniques for mapping lesions using MRIcro.
My tutorial mentions some of the basic details for outlining lesions based on T1/T2 MRI scans and CT images. It is important to note that these structural scans only show clear anatomical damage. It does not necessarily follow that regions that appear structurally intact are functioning normally. In addition, the borders of lesions are often poorly defined. Finally, tissue swelling, tissue resorption and ventricular swelling can make it difficult to identify corresponding regions on a template image from a healthy brain.
Techniques for mapping lesions
With MRIcro you can draw a Region Of Interest (ROI) to define the location and the size of the lesion. There are two main ways that you can draw a lesion that each have a unique set of strengths and weaknesses. You may want to choose the best technique for your project, or implement both solutions.

Overlays, Subtractions and intersections
This section desribes the techniques outlined in the "Working with multiple ROIs" section of my tutorial. The tutorial includes images that illustrate these functions. Specifically, this section describes how ROIs that map lesions can be combined from a group of patients. These techniques can help us understand the function of different brain regions.
One common technique for showing the anatomical regions frequently associated with a behavior is an overlay plot. With MRIcro, this involves drawing and saving a ROI for each patient. Typically, you create all the ROIs on a single template brain. You can then create an overlay plot that simply overlaps all of the lesions. Different colors mark the number of patient with damage in a specific area. For illustrations and details, see my tutorial.
Overlay plots are very popular and useful. However, it is often unclear whether they are indicating regions that are associated with the deficit you are studying or whether they are simply vulnerable areas that are commonly damaged in strokes. To solve this problem, you can collect data from patients with similar etiology who do not exhibit the neurological deficit you are interested in localizing. Clearly, you want to identify the regions that are typically damaged in the patients who show the deficit but spared in the control patients. One possibility is to show overlays for both groups. Another method is to 'subtract' the overlay of the locations of the control group lesions from the experimental patient group. The resulting subtraction plot shows hotspots indicating regions that are damaged in the patient group yet spared in the controls. For illustrations and details, see my tutorial.
In addition, you can use MRIcro to measure the percent of a certain structure that has been damaged in a patient. As with the other techniques, you start by creating ROI maps of the lesions. In addition, you create a ROI that defines the structure you are interested in (e.g. the putamen). You then select 'Intersection [mutual to A and B]' from the 'ROI comparisons' command (in the ROI menu). For each patient's lesion, you select the original lesion ROI and the area of interest. A new ROI is created that shows the amount of the patient's lesion that fals within the structure you have defined. For illustrations and details, see my tutorial. Another way to examine which anatomical regions have been compromised is to use the Brodmann map, as described below.
One of the traditional ways for mapping patient lesions are the templates developed by Damasio and Damasio (1989). The general idea is that the lesions are traced onto a standard template image of the brain. The template includes details of the Brodmann Areas that have been compromised. This allows the lesion locations to be approximately described based on the Brodmann Areas. The great advantage of this technique is the simplicity. However, because the black and white Damasio and Damasio template only contains the outline of the cortex, it is often difficult to precisely locate where the lesion should be drawn ( a problem also found in the template set developed by Frey et al.). It is much easier to outline a lesion when you can see the anatomy of the template (e.g. drawing a lesion on a grayscale MRI scan is easier than on a black and white template because you get a better idea of the local subcortical landmarks).
MEDx introduces a clever solution to this problem with their Analysis of Brain Lesion (ABLe) software. With this package, the user draws the lesion on the patient's actual MRI or CT scan, and then the image is automatically normalized (coregistered) to a template brain that includes overlays of the Damasio and Damasio Brodmann Area overlays. However, one problem with the current version of ABLe is that the final image is not matched to the MNI templates used by neuroimagers. Therefore, it is difficult to compare ABLe results with findings from functional neuroimaging.
MRIcro takes another approach - the user draws the lesion either on the original patients scan (patient scan technique) or on a MRI scan from a healthy individual (template technique). Crucially, the lesions are then presented in the same Talairach/MNI stereotaxic space used by neuroimagers (if the patient scan technique is used, the patient's brain image should be autmatically normalized to make sure the brain is aligned in stereotaxic space). Note that this MNI (aka ICBM) image does not exactly match the Talairach atlas.However, a basic atlas for this image is available. The MRIcro approach has two benefits. First, the lesions are always drawn on a MRI scan (so the user can look for common landmarks). Second, the lesion volume and location are directly comparable to popular neuroimaging studies.
However, what if you want to find the Brodmann Areas involved with your patients? Because the neuroimager's template does not match the Damasio and Damasio template (or even the Talairach template), one can not directly use these tools to determine the Brodmann Areas involved. One solution is to use the Talairach Daemon used by neuroimagers.
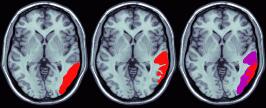
Another solution is to use a Brodmann Map that has been developed to match the neuroimagers template image. The illustration below shows this map. This map is based on recent work from the Van Essen lab, who developed Brodmann Area maps with corresponding Talairach coordinates for both humans and monkeys. Krish Singh (the developer of mri3dX) plotted this map on the MNI/ICBM 'iconic' single-subject MRI template brain used by neuroimagers. This new map allows users to take lesions mapped onto the template image and determine the Brodmann Areas that have been compromised. The two leftmost figures illustrate this process in MRIcro. Note that a posterior lesion has been mapped onto the template image, and that the lesion can also be displayed on the Brodmann Area map.
It is important to stress that ANY human mapping of Brodmann's Areas on the human brain remains speculative. I have discussed my concerns about these techniques on a web page I wrote with Matthew Brett. I am supplying the Brodmann software as is - both Krish Singh and myself feel that this map should be used with extreme caution. Modern in vivo human imaging technques can not accurately detect the differences in cytoarchitecture required to determine the Brodmann Area boundaries, and the sucli do not always predict these regions (see Amunts et al, 2004 NeuroImage 22, 42-56). Therefore, determining lesion location as well as Brodmann Area location in living humans is probabilistic - any map that shows discrete boundaries is a 'best guess'. Never-the-less, many people have requested Brodmann Maps and I feel that this is best that is currently available (though do note that some bits of the corpus collosum and insula are listed as neighboring Brodmann Areas - this is because the Drury data was dilated to "fill" all the grey matter). More importantly, I like the idea that this map matches the template used by neuroimagers, so even if you present lesion location on this map, neuroimagers will be familiar with the locations you are describing.
Using the Brodmann image in MRIcro is simple. First, download and install a copy of my MRIcro software and template images. Run MRIcro and draw the lesions on the template. After carefully drawing each lesion, make sure to save them to disk. Finally, open the Brodmann image with MRIcro. It is important that you select the 'Brodmann' color scheme (from the 'Slice Viewer' menu). Notice that as you move the mouse over different regions of the image, the corresponding Brodmann Area number appears in the bottom left. You can then open your lesion (select 'Open ROI[s]' from the 'ROI' menu). Finally, by pressing the 'i'nformation button from the 'Region of Interest' panel, you will be shown a text output indicating the Brodmann Areas that have been compromised.
Additional features: ticking the 'invert' button in the slice viewer will make the Brodmann Areas appear brighter or darker. The dull color may make the lesions more easy to view. Also notice that you use 'Apply intensity filter to volume' to filter your lesion so it only includes selected Brodmann Areas.
Lesion template images are now included with every copy of MRIcro.
Simply download and install this software. For more information, see my general homepage for MRIcro. You should view the Talairach image with the 'Brodmann' color scheme is included with MRIcro.
 |